 |
The FUBAR141
Counterstrike Website
|
|
The FUBAR141
Counterstrike Website
|
| Hints
And Tips - Creating a home Local Area Network (LAN)
Ok, firstly you'll need the following:
To start with, look at the dialog image from my setup, I have 2 peered PCs on 10MB network cards, X-over of course...
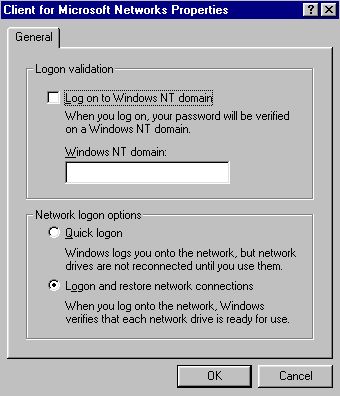
From here these steps should be done identically on both computers until I say... Here you can see my network service at the top of the list(client for MS networks) then my network card then my modem, then IPX/IPX protocol "bound" to my network card, hence the "->" symbol the same goes for my modem bindings. Now if you was to scroll down the list you would find 2 TCP/IP bindings, again they are bound to my network card and modem, followed by a "file and printer sharing for microsoft networks" object at the bottom of the list. If you do not have any bindings for your network card listed in your network dialog then click "add...", then select protocol from the list then you will be presented with another dialog. The left list is manufacturers, select "Microsoft" from the list, to the right will be a list of protocols that microsoft provide, from that list select TCP/IP and click "OK". now do the same again but this time instead of TCP/IP, add "IPX/SPX-compatible protocol" and click "OK". The components have now been added to the list, time to bind them to the hardware... You should now be back at the primary network dialog, double click your network adapter/network card in the list, then go to the "bindings" tab, then make sure all the boxes in that bindings list are checked... Which would be IPX/SPX and TCP/IP. You have successfully told your network card which protocols it will use on your network. Now we are going to go to the bindings tab on IPX/SPX protocol, go double click the IPX/SPX, remember to click on the one that your network card uses (i.e. not IPX/SPX-compatible Protocol -> Dial-Up Adapter as that is your modem!). Now there "should" be 2 boxes to check, client for MS networks and file sharing check them both, click ok... Go to the TCP/IP for your network card, and then go to bindings, do exactly the same as you did for IPX/SPX. Now it's time to configure the logon processing, double click "Client for microsoft networks", have it like this...
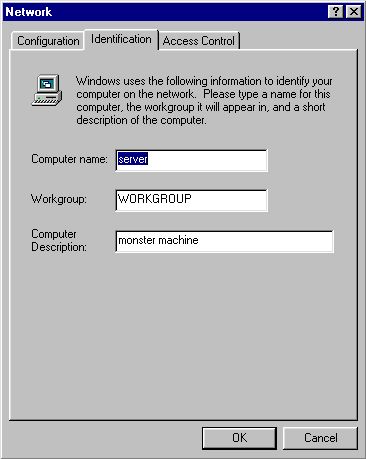
This is to make sure that any network drives you create on your network are connected as soon as logon is complete. Windows NT logon will not be needed as you are not logging onto a windows NT system. Proceed by clicking OK. Now to configure "file and printer sharing", you do want to be able to run your games from your network drives now don't you??? Of course :). Now open the options for file and printer sharing, you will or should at least, have 2 options: "Browse Master" - set this to automatic, and "LM Announce" - set this to "no". Also look at the first image at the top click the file and printer sharing BUTTON, do you want people to access your files on the network? Do you want to share your printer (s)? Up to you, the options are there for you... Now the final stage for configuring the computers together is to observe the first image, "Primary Network Logon", make sure this is set to what the image shows, next step is to independently configure the computers... First think of which computer you want to act as the beast of the network, the one that will hold most files, the one with the printer, the server is basically what it will be.... Think of 2 names... "server" and "client" for example, they can be our example names, and the word "WORKGROUP" might help. Both of your machines need to be uniquely named so that they can co-operate on the network, for each computer, enter a name in the "identification" tab of the primary network settings...
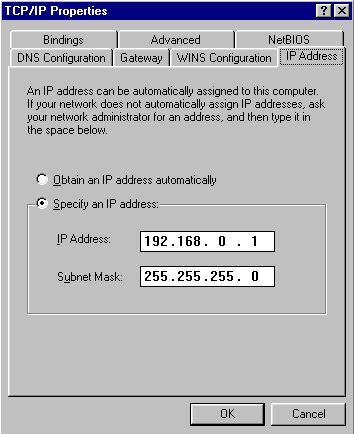
OK, now you should have done that, for the "workgroup" textbox enter "workgroup" for each machine, your computers are going to be grouped in a workgroup called "workgroup", put something else if you like, just make sure both machines are in the same workgroup, you don't have to enter a description if you don't like. That's that done, now go back to the components list, and open the settings for the TCP/IP that is bound to your network card, go to the IP address tab...
Make sure that the radio button is set to "Specify an IP address", for both computers set your Subnet Mask to 255.255.255.0, this will limit your network to 255 computers max, for your main computer set the IP address to 192.168.0.1, for the second computer set its IP address to 192.168.0.2. Now click OK to exit the TCP/IP settings, insert your windows CD then click OK on the primary network dialog, it will start to install the components and then prompt to reboot the systems. That's it!!! TESTING: Well now the 2 computers have rebooted, logically, your network should be operational. Is network neighborhood on your desktop? Well if it is then open it and have a browse. To create a simple shared folder just go to the properties for a standard windows folder and then go to the sharing tab set your properties in there, apply a password, make it read-only. If you want you can map a shared folder as a network drive, so it is used from the other computer as a system network hard disk. It's simple, just right-click on the share from the network neighborhood and select "Map Network Drive..." from the drop-down menu, note that the "reconnect at logon" checkbox will reconnect the network drive as soon as you logon to the network using the drives. This is just the same as using a normal hard drive. Regarding CS, you can share your whole game and applications to the other computers, but before you do this, read ahead...
What if you have problems??? I dunno, all I can say is this...
|